New Agreement
To start the new agreement process, either click the New Agreement icon in the toolbar and select New Agreement, or navigate to More>Members>New Agreement.
![]()
The New Agreement page allows you to create an agreement with a member.
If an agreement was previously started or loaded from the Agreements queue but not completed, you will be prompted to continue the recovered agreement or start a new agreement. If you choose to start a new agreement, the recovered agreement will be returned to its previous queue.
The tabs, tab order, and fields displayed during the new agreement creation process will differ from plan to plan.
This page can be configured for the individual club (Settings>Clubs>club number>New Agreement).
See New Agreement Club Settings for more information.
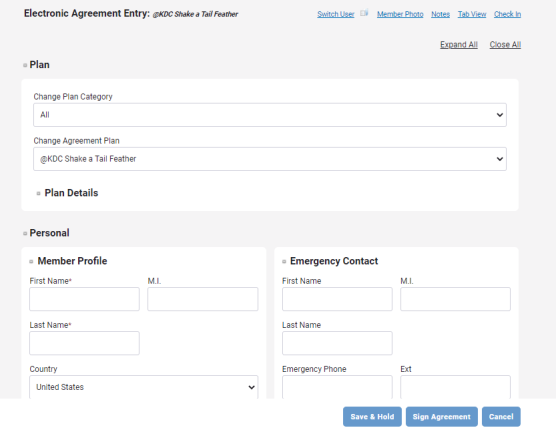
New Agreement Header
The header on the new agreement page will remain constant when you scroll. The header shows the name of the plan you selected, along with the following functions:
- Switch User: Log in as a different user to complete the Electronic Agreement Entry (EAE).
- Member Photo: Take and/or view a photo of this member.
- Notes: Enter a note about this agreement.
- Tab View / Full View: toggle between view types for this page.
- Check In: Return to the check in page.
- Expand All / Close All: Expand or collapse the sections below.
A "no" icon will indicate that the section is incomplete, whether you are viewing in the expanded or closed view. An example of the closed view is shown below. In this example, only the Plan, Fees, and Payment Amounts sections are complete.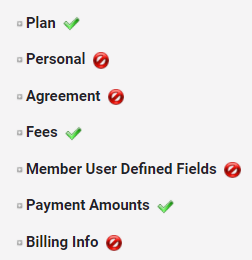
Create a New Agreement
Click the name of a section on the New Agreement page to expand or collapse it.
Some of the New Agreement sections described below may not appear for your selected plan.
- Create a New Agreement
- Plan
- Personal
- Secondary Members and Children
- Agreement
- Member User-Defined Fields
- Billing Info
- Miscellaneous
To create a new agreement with a member:
- Navigate to More>Members>New Agreement.
- In the Plan section, select a plan category, then select a plan from that category.
Click Plan Details to learn more about the plan.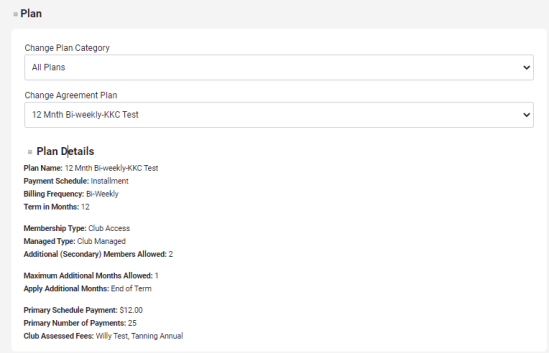
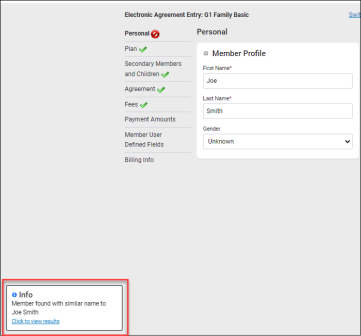
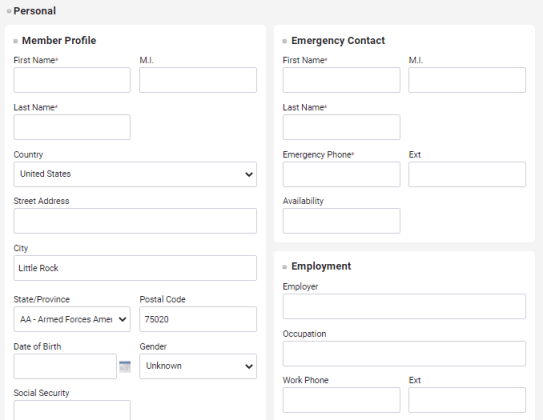
- Select the Personal tab. Complete the Member Profile, Emergency Contact, and Employment sections with the following information (an asterisk indicates that the field is required):
- First Name*
- Middle Initial
- Last Name*
If another name in Membership and Operations closely matches the first and last name you entered, you will see a prompt at the bottom of the screen. The "Click to View Results" link will open a member search with the first name and last name pre-populated so that you can determine if the person already has an agreement.
- Country
- Street Address
- City
- State/ Province
- Postal Code
- Date of Birth
- Gender
- Social Security Number
- Driver's License Number
- Email Address (check None if the member does not have an email address)
- Primary Phone
- Mobile Phone
- Fax Phone
- Emergency Contact First Name
- Emergency Contact Middle Initial
- Emergency Contact Last Name
- Emergency Phone
- Emergency Phone Extension
- Emergency Contact Availability
- Employer
- Occupation
- Work Phone
- Work Phone Extension
- Availability
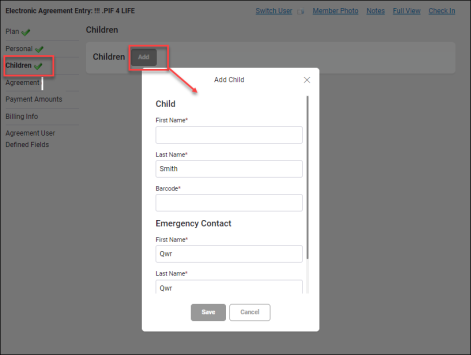
- Select the Secondary Members/Children tab.
If there will be any adult members on the agreement other than the primary member, click Add next to Secondary Members. Fill in the text fields in the Add Secondary Members dialog and select whether to enable Card on File and/or Club Account for the secondary member. Click Save. Do this for each secondary member. - If there will be children associated with this member, click Add next to Children. Fill in the text fields in the Add Child dialog and click Save. Do this for each child.
Because some plans disallow secondary members and/or children, you may see different options on this page.
- Select the Agreement tab.
The new member's automatically created agreement number will be displayed. If needed, you can change the last five digits of the agreement number to another unused agreement number.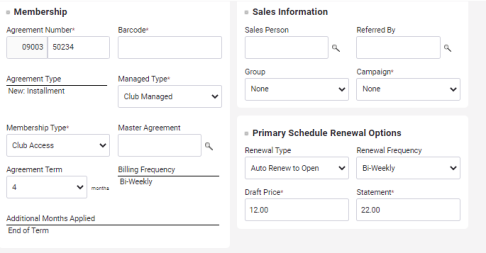
- Enter the member's barcode, managed type, membership type, and agreement term in months.
- If this agreement will be associated with a master agreement, search for and select it in the Master Agreement field. See Master Agreements for more information.
- Enter or search for the agreement sales person and referral person.
- Select the member group and campaign.
- If needed, change the dates in the Dates section. These date fields will differ from plan to plan.
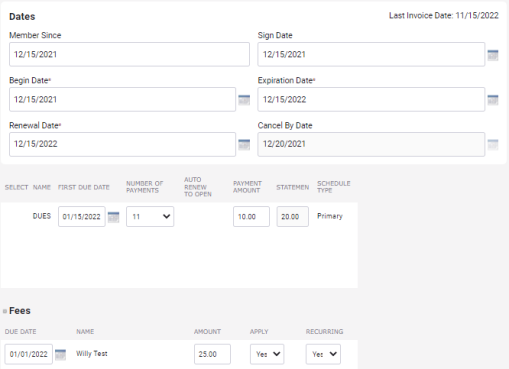
- The dues amount and date for the plan is listed in the lower half of the Dates section. If needed, you can change the first due date, number of payments, payment amount, and/or statement amount.
- If needed, on the Fees tab or in the Fees section change whether to apply the fees associated with the plan (Apply: Yes/No) and whether the fees are recurring (Recurring: Yes/No).
- If needed, change the fees amount and due date.
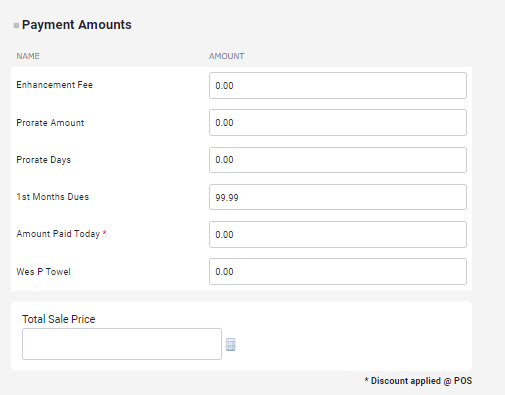
- Select the Payment Amounts tab, if it is present. Enter or change the amounts in the Payment Amounts section as needed.
- Fill out the user-defined fields associated with the plan, if any. For more information, see Agreement UDFs.
- Select the Billing Info tab. If the buyer of the agreement is not the member, check the Buyer's Information checkbox and enter the buyer's first and last name and middle initial.
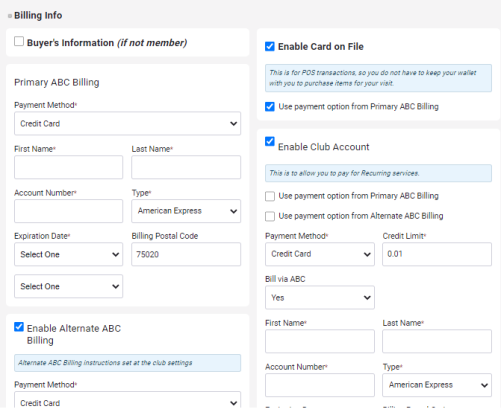
- Enter the primary ABC billing payment method information.
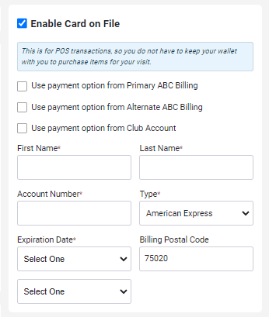
- If you want to use a Card on File, check the Enable Card on File checkbox. Either enter new card information below, or check one of the Use payment option checkboxes to use card information entered elsewhere on the page (these checkboxes will only appear if Enable is checked for that payment type).
- If you want to use alternate ABC billing, check the Enable Alternate ABC Billing checkbox. Enter new card information below.
- If you want to use a club account, check the Enable Club Account checkbox. Either enter new card information below, or check one of the Use payment option checkboxes to use card information entered elsewhere on the page (these checkboxes will only appear if Enable is checked for that payment type).
- If the Miscellaneous tab is present for the plan you chose, you can enter any additional information that does not correspond to an existing field for the plan.
- Do one of the following:
- Click Save and Hold to save the agreement and place it in the Hold queue. The agreement can be located on the Agreements page.
- Click Sign Agreement. The completed agreement PDF will appear.
- If the member is ready to pay, click Save & Pay to save the agreement and place it in the POS queue for checkout. A pending POS transaction will be created.
If you click Save & Hold, the work flow will depend on the agreement's Purchase Today status.
- If you click Cancel during new agreement entry, a confirmation dialog box will appear.
- To cancel the agreement and remove all entered data, click Yes.
- To continue entering the agreement, click No.
the Skip Approval Queue flag has been turned on for your club, the agreement is automatically approved and posted directly to ABC’s billing system without going through a separate manual approval process.
By default, the Manage Agreements page will open when Save & Pay is clicked. Alternatively, you can set the Calendar, POS page, or member page to appear (Settings>Clubs>club number>New Agreement>After Save & Pay).
See New Agreement Club Settings for more information.
See Agreements to learn about managing created agreements and agreement queues.